Workbenches, old American iron machine tools, my favorite hand tools. All these things are pleasing to my eye and inspired me to do work that is befitting of these tools.
There has been this one sore spot in my shop for quite a while that I've been meaning to do something about. The Grizzly table saw picture below is one that I purchased in 2004. Before I developed a taste for old American iron. There is really nothing particularly wrong with this saw that can't be resolved with new arbor bearings, belts and a considerable amount of tweaking. It has served me well but it just doesn't inspire me in the same way as my other tools. I removed the top a couple weeks ago to replace the arbor bearings. In the process it occurred to me this saw is basically an older model Delta Unisaw clone.

I always thought that I would find and purchase a 1940s, or 50's era Unisaw to restore, and add some upgrade features like a sliding table, improve the dust collection and be very happy, however it's beginning to be difficult to find those type saws in decent shape. I really didn't have time to bring one back from the dead, and besides, by the time I purchased the saw, performed the restoration and added the sliding table I would have been into the kind of money that would buy a new SawStop with flesh sensing technology.
In the same spirit that companies like Rousch will take a car and make it a much better car and then badge it with their name I hatched a plan to do the same with my table saw. I designed and ordered the new badge and placed an order for the sliding table.
So one recent Saturday morning I completely disassembled this saw. Literally all the way down to the base cabinet. By Sunday afternoon, and a lot of work later, all the parts that I intended to paint the same Sage Green color as my lathe, were painted the Sage Green color.
With the saw in pieces the opportunity to paint this saw was more than I could resist. I just couldn't see looking at the Grizzly green any longer.
I realize color is a very subjective thing. It's the kind of thing in which you have to please yourself. I like the color scheme I used on my PM90 lathe a great deal and wanted to use the same scheme on this tool. One thing that made painting the cabinet easier than it would have been otherwise was the hammered type texture of the factory paint. In lieu of having the problems of painting very smooth sheet metal which will develop runs quite readily if you aren't very careful, the textured factory coating make this much more like painting cast iron.
I also acquired two 40 or 50's era Delta Unisaw hand wheels. The clunky cheap hand wheels on this saw were one of many the things I really disliked.
Throughout the next week I cleaned and painted trunnion parts, stripped the paint off the fence tubing, and restored the hand wheels making sure not to disturb the beautiful patina on the rim.

When those details were completed I then turned my attention to detailing the new hardware. I like the black chrome look that can be attained by sanding, bluing and then applying wax and a nice polish on the heads the black oxide fasteners.

The following Thursday I started the painstaking process of re-assembling the saw. In the picture below I've installed the new badge (as far as I know there is no E/Z Toolworks, except in my mind). I've been told that I have a whimsical imagination at times.

Putting the trunnion back into the saw is something that requires great care. It will have everything to do with how the rest of the assembly process goes and how well the movable parts of the saw will function. This was also the first opportunity to see how the hand wheels would look combined with the other details.
While installing the trunnion I discovered why some of the features of this saw worked as they did. Or didn't work as they should. During this process I made custom spacers, washers and whatever was necessary to make things right and well tuned. Having metal working tools at hand can be a real advantage at times such as this.
When installing the cast iron top I took great care aligning the mitre gauge slot to the blade in hopes that this would facilitate the installation of the sliding table attachment. The sliding table is the same one sold under many different brand names. Laguna, Shop Fox, Grizzly, etc. I have to say that I was impressed with the quality of this item. I did have to modify the holes where this piece mounted to the top of the saw in order to allow enough movement to align the critical surfaces.

Fortunately I don't have to depend on my table saw for breaking down sheet goods in the rare case that this need arises. I have a track saw for that task. This means I don't have to remove the mitre gauge from the sliding table. Once set it produces accurate and repeatable cuts and has a capacity of 48" which I doubt I'll ever need. The first task for the sliding table was to cut the table insert board for the right side of the saw top. It cut across the 16" width producing a dead square end.

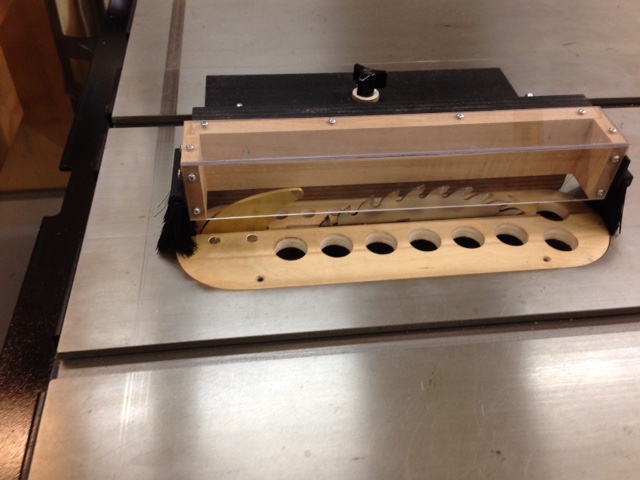
Now that the saw was working I needed to make it safer to operate. I set about making the splitter shown in the picture below. It looks like a riving knife but it is attached to the insert and is adjustable by the two screws without removing the insert. It is also easily removable.

With the amount of air I'm pulling thru the perforated insert I needed the guard to provide two function. Keep the saw dust in the insert area so it would be pulled into the dust shroud and to put something between the operator and the saw blade. I've had a couple mishaps with table saws in years past and when I go into a shop where the table saw blade is protruding uncovered by a guard it actually unnerves me just a bit. Fortunately I can still count to ten on my fingers but one of them looks a bit different than it used to.
This guard is rather adjustable and it's easy to put it in the correct position for any operation. The only downside is that I do find myself spending a considerable amount of time positioning it and for that reason it's a bit what I would call, "fiddly". It may require a bit of re-design. I'll noodle on that for a while.
For a guy that does a lot of hand tool work you may think I've gone thru a lot to bring this saw to it's present state. Franky I'm getting on in years and I just can't spend as much time hand sawing as I have in the past and still make steady progress on my woodworking projects.

Now any issues with table saw function have been resolved. It has a much more pleasing appearance to me and it's one more thing that makes me happy when I walk into my shop. I've found the more things you have in your shop that make you smile the happier you are working there.
Ron
"I destroy my enemies when I make them my friends."
Abraham Lincoln


