

The stainless does however live up to a reputation for being difficult to work. You'll go thru more tooling than with any other metal and cutting lubrication is an essential key to being successful with this material. Drilling is an area of much concern. You can work harden this material in the bat of an eye and once this occurs your only recovery will be with carbide tooling, however it's really just a better idea to avoid this occurrence. Sometimes it's just not within an acceptable design parameter to remove a few more thousandths with the carbide tooling so working hardening can also mean scrap parts and if this part happens to be a plane side that is match milled to the other side it could mean scrap parts time two. When one considers that precision ground 410 stainless is typically priced three times what you would expect to pay for mild steel....well, it can get expensive real quick. You learn that it's cheaper to pitch the drill bit that you're not really sure about rather than create stainless scrap. The trade off is evident a $4.00 drill bit versus a $135.00 stainless bar.
 There is also a considerable amount of irony in working 410 stainless. In the photo above you'll see that one of the planes sides has been refined by removing the milling marks from the edge, and the piece in the background awaits this process. 410 stainless is formulated to be" wear resistant" so when you working an edge to remove the milling marks it comes to mind that you are trying to wear material that is "wear resistant." You can't think about this for very long because the idea of it will make you weary. As a comparison, anything that you can do in brass that requires 10 minutes of work will take 1 1/2 to 2 hours in stainless. Once again don't think about this too long or you'll go completely off the idea of corrosion resistance plane bodies.
 I will have to say that milling 410 stainless with carbide end mills is a relatively easy task if you provide the cutter plenty of lubrication so it's not difficult in every aspect of fabrication but it will wear tooling at a much higher rate. It is not the easiest material to surface grind. I typically can get parts out of the mill at very close tolerances. It's pretty typical to achieve tolerances of .0005 on the width a plane sole in a length of 14" and that bit of inconsistency (if you would call .0005 an inconsistency) can be removed on the surface grinder if one wishes to do so.
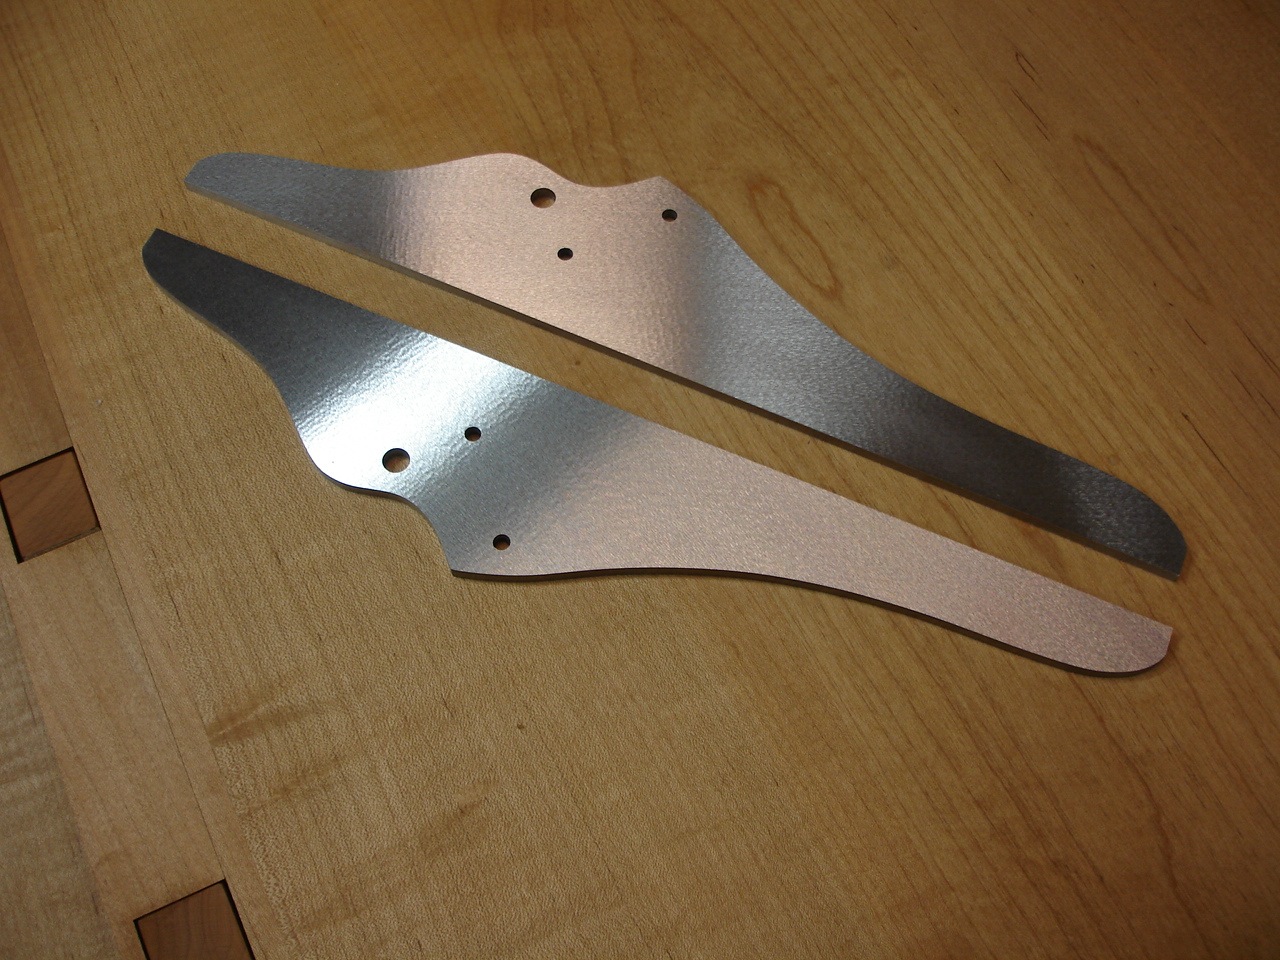 Creating the stainless tweed pattern on the interior surface of the sole requires indicating every part when it is put into the vise and quite frankly what passes as precision ground bar these days usually isn't quite accurate enough to accommodate a milled texture that is only .002 deep in the surface. Therefore these pieces have to be reground here in the shop. The tweed pattern is a math/milling puzzle and attempting to assure that it is perfectly centered on the plane sole can drive a plane maker "round the bend."
The picture below shows the process of milling the tweed pattern, anyone can cut milling patterns in metal but to cut a milling pattern that has a holographic effect and looks like tweed fabric is a different thing altogether. It requires the correct starting point, the proper pitch of the overlap, the correct feed rate and depth of cut.

 The picture below features two new additions to the shop. When attempting very precise work in demanding materials accurate working holding is very key. These two Glacern vises are very well made tools and are quite up to the task once they've been accurately set and indicated to the mill spindle and one to the other. I indicated these vise the same day I milled the stainless tweed pattern on two set of plane soles. Somedays you can just wear yourself out with math.
 I certainly did not mean to post a gloom and doom of working stainless entry today. But sometimes a little insight into what's required to perform this work is helpful. I do believe the effort is worth the result. The stainless tools have a quality that is quite different in look and feel. The emphasis on very precise work in these tools is important in my effort to consistently create planes of this quality. Of course when all the pieces of a tool fit together quite precisely and solidly you have a plane that when in use.... nothing moves but the shaving. Include an iron with a quite sharp edge and wood fibers just don't have a chance.
My next post should show the final parts required before assembly of the plane body and the body assembled, that is unless I get off on another tangent. It's been know to happen. (grin)
Ron
Very interesting - thanks for the insights! Keep up the good work,
ReplyDeleteAndy
Great post, Ron. This is great.
ReplyDeleteThanks for the look into your world Ron. It will be interesting to see the progress of the new series.
ReplyDeleteHi Ron
ReplyDeleteHow do like those Glacern vises?