Monday, December 24, 2012

Merry Christmas and Happy Holidays!


"and the stockings were hung by the chimney with care"


We have a house full this year. Children and Grandchildren abound. There's a lot of work required to schedule and prepare meals........we wouldn't have it any other way. I hope everyone enjoys spending time with their family this holiday season.

Merry Christmas and Happy Holidays,

Ron

Thursday, December 6, 2012

Just Add Wood


When a woodworker without prior metal working background or experience looks at a plane body they typically assume that this is the most challenging part of making a plane and honestly making close tolerance parts that go together to make a very close tolerance assembly is a rather challenging undertaking. This requires the acquisition of a whole new skill set so it does probably seem quite a daunting task.

So now we are to the point of fitting the wooden bits and because we're all familiar with working wood this should be easy right? Think again. The woodworking required to create a plane made to a very high standard can easily be as challenging as making the metal parts of the tool.

The individuals that blazed the trail of independent plane making, especially infill planes, set a very high fit standard. Anyone pursuing this work subsequently must be able to create work at this standard in order for their work to be accepted or considered top caliber. If you're looking to create comparable work then just okay is not good enough.

The point I wish to make is this. There is an awful lot of work left to be done when the plane body is finished and the woodworking starts, and as James Krenov was known to say, "there's still time to mess it up". That is true right up to the end. Funny thing is, everything I've done for a living in the past 20 years has been one of those "there's still time to mess it up" type pursuits. I guess I enjoy the challenge.

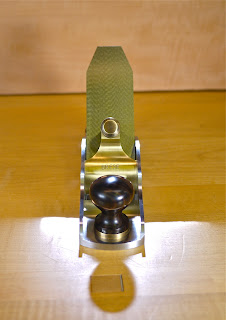
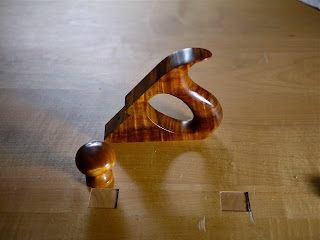
As you can see in these picture I've got this to do four times in the near future. I'll let you know how it turns out.


If you don't have anything really pressing for the next 3 minutes or so you might enjoy the video below.  I certainly did.


Ron


An old saying from India,


Everything will be okay in the end, if it’s not okay then it’s not the end”

Friday, November 16, 2012

Olive Wood Revisited


Have I mentioned that I like working with Olive Wood? If you read this blog regularly I guess you know that I have mentioned that a few times. Well, maybe more than a few times. Recently I've had the pleasure of completing two planes that feature Olive Wood.

One of these planes was a version of the new Winter Panel plane. This plane featured a stark contrast of the blonde olive wood against a plane body of steel with an aged patina and brass that also had a patina finish applied. During the process of making this plane I didn't really know how this would all work together but once it was completed I have to say I was absolutely smitten.


I think the color of the brass relates to the Olive enough to draw all the elements together. But Olive wood really has to be touched to be truly appreciated. This wood is naturally a bit oily and I think that's the reason it works well with a shellac finish. It almost provides it's own polishing lubrication and the feel once it is refined is something that has to be experienced to be fully appreciated.


The other wonderful characteristic of this material is the way it changes color with age. The color transition doesn't occur as drastically as you would see in rosewood which can change color in a matter of days once exposed to air and light, however the color change does occur at a more rapid rate as compared to a wood like cherry. The picture above shows just how much the color change can occur in approximately a year.

The other plane that I've recently completed is a stainless 912-50S Smoothing plane.(See Below) This tote and knob came from what could possibly be the best piece of Olive I've had the pleasure to work. Curl figure along with contrasting dark striping. Another notable thing about Olive is the curl figure gets more intense as the color darkens. The first piece of olive that I used to make plane parts did not really show any evidence of curl but once it aged curl began to show up all thru the tote and knob.

There is a lot of curl already showing in the wooden bits of this latest plane. I can't even imagine how it will look once it's aged and looking it's best.


Of course there wouldn't be much point in making a plane of this nature that didn't have performance value to match it's looks, so I've attached a video of the Winter Panel plane in action. This video is available in HD so the best viewing is obtained by selecting this quality option.


Ron


An old saying from India,


Everything will be okay in the end, if it’s not okay then it’s not the end”

Tuesday, October 30, 2012

Winter Panel Plane, a Bit Early


This plane actually started as an order for a Stainless 132-50P Panel Plane but when the customer saw pictures of the Winter Smoother from this past year he immediately called to ask if a Winter Panel Plane was in the works. Fortunately I was already thinking about a larger format plane for the Winter line of metal bodied planes and even though I pretty much had this plane sorted out in my mind I still had to put my ideas on paper.

As is usually the case,  putting my original ideas into a sketch just created a starting point. I left the sketch on my drawing board and every time I went into my office I would take some time to look at the sketch. Little by little I made further changes and refinements until finally I redrew the plane in the final version. When my customer saw the drawing he decided to change his order to this plane.


This plane is now on the way to it's new home in St. Louis. I had become attached and hated to see it go. Oh well, I get to have them all for just a little while. Besides, I have another one with Olive Wood bits very nearly finished and it has a twist.


This plane has a 2.25" wide iron pitched at 50 degrees and the sole is 11.125 long. The wooden bits are Macassar Ebony.


Ron


"I find that the harder I work, the more luck I seem to have."
- Thomas Jefferson (1743-1826)

Monday, October 15, 2012

This Plane Has a Secret


Recently a customer sent me an older infill plane for repair. This led to a discovery. The infill in this plane had become smaller and the iron was no long bedding properly. When the rear infill became smaller it also reduced in height. This in turn effectively lowered the angle of the bed which rotated the cutting edge of the iron up which meant the plane no longer had a mouth.

In order to repair this plane I had to once again make the bed 50 degrees. This wasn't a matter of removing a high spot in order to regain the proper bedding. In this case I actually needed to add some material to the bed. There is not an elegant way to add a .010 thick piece of wood to the plane bed so I decided to use the same technique I use on my metal bodied planes. At the point in which the lever cap screw applies pressure I drilled a recess to house a brass seat. I could then tune the height of the seat in order to re-establish an accurate bed angle. This solution worked great for putting the iron back at the proper pitch, however this solution effectively moved the iron off of the wooden bed of the plane except for the point at which the seat was let into the rear infill. The question of course is whether this would change the feedback the planes gives the user in use.

Miraculously I could tell no difference. The dampening was still taking place and of course this begs the question of whether it's the iron on the wood or the fact that the plane is completely infilled with wood that gives it that dampened feel in use. Of course the upper section of the iron was still separated from the metal structure of the plane by the wooden infill.

I had been contemplating a plane that was infilled yet bedded the iron on a metal bedding plate of the type that I use in my metal bodied planes. I had the perfect candidate for this experiment. The next tool in my schedule was a shooting board plane that I was to make for my good friend and customer Steve Walls. He gave me free run with the design of the plane as long as the outward appearance of the plane remained mostly unchanged.


The finished product was a plane that outwardly looked almost identical to prior versions of my Shooting Board Plane. However the secret was under the iron.  A metal bedding plate that was integral to the plane sides and a brass bedding seat.


Not having a wooden bedded version to test side by side makes my impressions of this plane somewhat speculative. However from the best of my memory this plane feels just like the prior versions in which the iron was bedded directly on the infill. I think this idea needs further exploration.


Besides the bedding plate this plane has been updated a bit. It features a new style lever cap, it now uses a 2.125" wide iron in lieu of the 2" iron in prior planes, the sole thickness has been upgraded to .437 thick, the sides have been changed from .250 to .187 thick and the body is now made from high carbon steel. This was also the first of these plane in which I used Macassar Ebony infill. With these changes and the Macassar Ebony infill the plane weighs right at 8 1/2 lbs. This kind of mass in a shooting plane is really nice.

Below is a short video showing this tool in action. It also provides a good look at an early version of the Vogt ToolWorks shooting board.


Ron


Monday, October 1, 2012

HandWorks

I'm not one to wish my life away. When you begin to get older you actually wish time would slow down. I am looking forward to cooler fall temperatures but I'm especially looking forward to next spring. However I'm not in a hurry because I need time to prepare.

As much as I enjoy fresh spring flowers and the emerging green foliage that signals the end of winter I'm especially looking forward to Memorial Day Weekend 2013.

On this weekend the Hand Tool Woodworking Community will be coming together at the Festhalle Barn in historic Amana, Iowa. I've been to this timber framed barn and as I was walking thru this building I could see this event taking place in my mind......and it was perfect! When you look up at the structure of this building it makes you think about time honored craftsmanship. What better place to hold an event that celebrates working wood with hand tools.

You can pick on the banner below and it will take you to the event web page so you can get all the details. But this much I can tell you will be happening. Saws will be sawing, planes will be producing all manner of shavings and a lot of old friends will be coming together in the spirit of working wood. I for one will be looking forward to making some new friends as well.

Hope To See You There!

Ron


"A lie gets halfway around the world before the truth has a chance to get its pants on."
- Sir Winston Churchill (1874-1965)


Tuesday, September 25, 2012

Nothing Looks Quite Like Koa and a Song


One of the most popular tools in my Stainless line of planes is the 812-50S smoothing plane. It's a great size and it covers a large scope of task for a bench plane. When luthier Richard Wile contacted me about ordering one of these planes he requested that I take my time and find an exceptional piece of material for the wooden tote and knob for this plane.

Most independent plane makers keep an inventory of quite special and even rare woods but Richard indicated he was looking for something a bit different. I had in my possession some wonderful pieces of Olive but I was pretty sure those would not be dry in time to use for Richard's plane.  Along about that time my friends Steve Walls and Charlie Levan came by the shop for a visit and when Charlie walked in the shop he handed me a piece of 8/4 koa and said "see what you can do with this". You'll see what Charlie can do with Koa at the bottom of the page.

Koa is a wood that I had investigated but I always hesitated because it is not nearly as dense as most woods used by plane makers. Well here I had a piece in my hand and I was at the point of making the wooden bits for the prototype Winter Smoother (see below) and I asked myself " why not?" I was intrigued with the Koa. The variegations in this wood are compelling.


As I was making the tote and knob for the Winter Smoother I was a bit concerned about the durability of the koa. Not so much the knob, but the tote gave me some concerns. The entire time I was shaping the rear tote I was still questioning whether or not I would actually use this tote. Once the tote was refined and it came time to apply the finish all my doubts were vanquished. Nothing looks quite like Koa!

At this point I set about looking for some Curly Koa for Richard's plane and I soon found an exceptional piece.


When purchasing  kiln dried Koa you have to consider the average moisture content of wood in Hawaii. They typically don't dry wood to a moisture content of less than 10%. In most areas it will reach an equilibrium moisture content of about 12% percent after it's been out of the kiln for a period of time. Once I had a couple of blanks in my shop they still needed time to acclimate and reach a drier condition.

When Richard's plane was complete I was smitten.  I had a hard time bagging this plane and packing it for shipment. I wanted to take just one more gossamer shaving. Oh well, I get to have them all if for just a little while.


When I informed Richard that I was editing some video of this plane in action he sent me a music file he thought I might like to use with the video. The music accompanying the video is by Richard's son also named Richard Wile and even though I don't know for sure there's a good chance the instrument he's playing was created by his father's talented hands. The young Richard Wile does a great job of manipulating a wonderful sound from this instrument with his talented hands.


And if that's not enough figured Koa for you then take a look at this picture of a Koa rocker made by my friend Charlie Levan.


Ron

If you can’t explain it to a six year old, you don’t understand it yourself.
- Albert Einstein


Friday, September 14, 2012

Specialized Rasp for Tool Handles


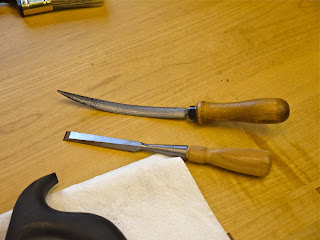
I was contact by Noel Logier of Logier Rasp inquiring as to whether I would be interested in trying one of his rasp made especially for tool tote shaping. They call it a "Handle Makers Rasp" and it comes stitched as a #9, #12 or #15. I was of course interested and we decided that the #12 stitching might be the most appropriate set up for my work. I've shown the rasp along side a Lie-Nielsen socket chisel for size comparison and also because I use that chisel a great deal in my tote shaping work.


Let me make something clear. This tool was offered as a trial, not a free tool and should I decided to keep this rasp (and I most probably will) I will be paying full price for the pleasure of having this tool at my disposal.

I also have one of the Gramercy rasp made for this application but to date I've not had the pleasure of trying one of the Auriou rasp. I hope to have the opportunity to do so at some point in the future.

So far I have shaped three tool totes with the Logier rasp and I've rather enjoyed the use of this tool. One thing that was apparent straight away was that this rasp was not as broad across the width as the other rasp that I've used for this task. Some might say that one could vary the width given the tapering shape of the tool and that is true. However I find the overall narrower width makes this tool quite versatile. In other words with a narrower width you can shape areas of the tote to the shape you prefer rather than have parts of the tote conform to the shape of the rasp. This feature also makes it easier to reach into areas that are difficult to access with a tool of more width.

This rasp removes material quite quickly and effortlessly. I can't imagine for my use I would never need this rasp stitched #9. In fact I really think I might benefit from following this tool with a #15 stitched tool in lieu of a coarse grit of sand paper to clean up prior rasp marks. Any sanding I can eliminate makes me happy. Finer work is possible using this tool just by using lighter pressure. This is especially important when making the transitions on brittle edges of dense woods. This same rasp with #15 stitching could possibly work even better in that situation.


I do however have one gripe. This is not directed solely at the Logier rasp. In fact this problem resides in all the tools of this type that I'm aware of. My gripe is with the quality of the wooden handles that come with these tools.  If you look closely at the photo below you'll see the stark contrast of the well finished hornbeam handle that comes with the L-N chisel as compared to the non-descript, barely adequate handle supplied with this rasp. This tool would be a great deal more pleasurable to use if the handle were made from a well refined close grained or dense hardwood.

 We are presently living in a golden age of tool making of which I am proud to be a part. When I pickup one of my Lie_Nielsen, Blue Spruce, Czeck Edge or Elkhead hand tools the way the handle feels in my hand is very pleasurable. Given the relatively small size there's really no reason these rasp should be any different. I for one would be more than willing to pay a bit extra to obtain a tool with a high quality, well refined handle.

I understand that Lie-Nielsen Tool Works supplies their own handles with the Auriou rasp that they sell. Obviously they felt the same about this part of these tools.


Overall I like this rasp a great deal and it certainly is a tool that makes this task easier to accomplish. I'd certainly recommend this tool to anyone that has a fair amount of this type of work to accomplish, which would certainly justify the expense. I've certainly benefitted from having the opportunity to work with this tool and I look forward to using it a great deal more in the future.

Ron

"some days in the shop I feel like a complete idiot, other days I feel like an absolute genius......in reality I'm never either one"


Wednesday, September 5, 2012

The Drought is Over, and Goodbye Angel Belle

Some bloggers take the summer off from blogging and I guess most of you think I did the same. Truth be told I never really intended to take most of the summer off from this blog but things sort of happened to cause this to occur.


Just as Tropical Storm Isaac, then Hurricane Isaac and once again Tropical Storm Isaac helped end the drought in the midwest (way too late for the farmers) I'm hoping this post will end the drought of blog post for the Brese Plane blog.

So this is what happened.

Julie and I attended a family wedding in Florida and we decided to extend our stay in Daytona. I've never been to a place where cars were permitted on the beach. I have to admit the tradition at Daytona creates an interesting view when you look down the beach and cars are parked as far as you can see.

( I know there's supposed to be a picture here of a beach with cars but of course we forgot the camera)

When we returned from our beach trip we jumped into preparation mode for a visit from the little guy in the picture below. This was our first time keeping our grandson for a week sans parents. His parents dropped him off and headed for some fun in Savannah. It's been a long time since we were the responsible parties for a 2 year old in our house. We quickly learned it was a wise thing to take a nap whenever he did.


When Everett and his parents had returned home we fell right back into our work schedule and my focus was purely set on producing planes which I immediately set about doing. Things were going well and I was making some real progress on several tools which was also spawning some ideas for blog post. Just when I thought I was ready to settle back into regularly posting to my blog something occurred that I could never have foreseen.

I was painting some garden furniture out behind the garden house on a Saturday morning. Angel Belle was making her rounds in order to account for the whereabouts of everyone. This is her job and she takes it seriously even though she goes about it with a rather jovial attitude wagging her tail as she goes about her duties. As usual when she found me it required a greeting that included a neck rub and profuse petting. As I was rubbing my hand down her side I felt a firm mass just behind her right front leg that I immediately knew  was not a good thing.


A trip to the vet the following Monday confirmed my worst fears. By Monday the mass had grown noticeably and the vet informed me that it would continue to do just that. Angel Belle was 13 years old and surgery was not really an option for a dog her age. The vet sent us home with pain medication and his cell phone number.

I spent all my spare time during the next three weeks just being with Angel Belle. She had been a remarkable friend and companion and the most fun of any canine that has shared our home. There have been many but she was that once in a life time dog for me.

Over the next couple of weeks the mass continued to grow and she was quickly losing the use of her right front leg and laying down was becoming quite a painful ordeal. She would literally stand for hours at a time in lieu of laying down. I sensed she was about to lapse into a period of real suffering and I just could not allow that to happen. A scant three weeks after I discovered the mass she was gone.


That was about a month ago and her absence still looms quite large around here. Maybe I'm revealing a bit too much about myself but frankly this shook me to the core of my being. You may have noticed I never referred to her as "my dog". I rescued her when she was 9 months old, she had already bore a litter of puppies and was in the worst possible shape you could imagine. She had good breeding in her favor and with a new home where she was cared for and loved she blossomed into the dog she always had the potential to be.

You see it was more like "I was her person",

Ron

Tuesday, July 17, 2012

Summer


Summer looms in these parts. I'm working in an air conditioned shop. The blog will return soon.

Ron

Wednesday, May 30, 2012

Communion Cupboard Completed and Delivered

We were trying to get some projects completed before leaving for a trip to Florida to attend a wedding and I knew when I returned I wanted this get this cupboard out of my shop. It's been residing there way too long and I was tired of moving it out of my way and working around it while making planes.

I get that way about a project sometimes. In the course of some projects, especially ones that you only have a small amount of time to commit, you finally reach a point when you just get tired of looking at a partially completed object and the only way to get it out of your shop is to finish it.


 I have to apologize for not doing a better job of documenting the finishing portion of this project but frankly when you're wearing vinyl gloves for hand applying finishing materials and then when you have a spray gun in your hand is just not the best time to be handling a camera. Well not any camera that you care about.

Below you will see some of the flammable poisons I used in the finishing stages of this project. I have to say the finishing schedule on this project was quite involved. The first step was the sanding step. Even though I had worked almost all the surfaces with a plane there was still a necessity to do some sanding.  I was to add some color and therefore I needed a consistent scratch pattern so the colors would be absorbed in a consistent manner. I block sanded all surfaces to 220 grit and the end grain surfaces to 320 grit. I was conscious to use a block on this pine so as to keep a flat surface and not create the wavy surface that is the result of removing more material from the areas of softer grain.


The next step was the blocker needed to keep the pine from splotching. I use a mixture of 2 parts tung oil finish mixed with 1 part lacquer thinner. I applied this mixture liberally and then reapplied in areas that seemed to absorb this material quite quickly. I wiped off the excess with a cotton cloth and then removed the application rags from my shop and laid them flat on the ground outside to dry. This material is most definitely a flammable poison.

After allowing a few minutes for this mixture to evaporate a bit I then applied a Transtint dye made from 2 parts medium brown, 2 parts honey amber and one part reddish brown. This was mixed in distilled water.


After the dye had dried overnight I sprayed a nice even coat of one and a half pound cut dark garnet shellac to the all the components of the cupboard. The next day I sanded the dust nibs off with some 320 grit sand paper and applied a glaze of Sherwin Williams Fruitwood oil pigmented stain. The following day I sprayed all the parts with two more coats of the Dark Garnet shellac. Shellac is not a poison but the alcohol that I used to dissolve the flakes is also sold as camp stove fuel so it's most definitely flammable.

Periodically this piece will be used to display flower arrangements so I scuffed up the shellac on the top and back splash with some 400 grit sandpaper and then sprayed these parts with two coats of a  hybrid waterborne lacquer that has proven to be very water resistant in my house.


When we returned from our brief vacation in Florida I wet sanded all the parts with 600 grit wet/dry sandpaper and then rubbed them down thoroughly with #0000 steel wool. I then completed the final assembly, applied a bit of furniture polish and the next day the cupboard was delivered to the church.

The congregation seems pleased, I'm happy it's in the church instead of my shop, but when It was completed I would have been happy to have put it in my house.

It was nice to walk back into my shop the next morning and concentrate solely on plane making. I don't know exactly what my next woodworking project will be, but I do know this......it will be smaller than this cupboard.

Ron

Tuesday, May 22, 2012

Planing the Cupboard Doors, Video and More Video

So far I haven't shown the completed cupboard or even a sketch of the cupboard. I thought it would be more fun to have the viewer anticipate the final configuration based on the parts featured in the prior post.

I will tell you this, there are two of the doors featured in the attached video and the design is a very basic Shaker cupboard. In the next post all will be revealed. Good or bad. (Grin)

The linked video shows the final planing of the door battens and door panels. I've heard it said that a picture is worth a thousand words so once again here's thousands of pictures.


Video abounds this week. Recently Brese Plane had the honor to be featured in the second episode of "The Highland Woodworker." If you've not had the opportunity to view this episode follow the link below:

http://www.thehighlandwoodworker.com/

Ron


Friday, May 11, 2012

More Work on the Cupboard

The next step in the cupboard project was to rough out all the components. In the picture below the ends and the front face frame pieces are cut to rough size.


In the first post about this project I mentioned that a check existed in one of the boards and it was positioned so that it would run thru the end of the board and would be exposed on the exterior of the piece. This would not do so I set about ripping the board to remove the check and then prepping the edges in order to glue the board back together.


The two edges came together quite easily and you can see that the glue squeeze out was extremely consistent down the joint line with just 3 clamps along the length.


It was important that this piece be quite flat as it is the base for the entire piece. I used a long straight edge to sight the high spots and to check my progress as I removed material from these areas.


As I got close to flat I began using a set of winding stick. Actually these winding sticks were two of the vertical elements for the front of the cupboard. They are exactly the same size and were matched planed to match each other perfectly so besides being very accurately made components they also served as quite good winding sticks.


I then set about the same process on the piece that was to become the top of the cupboard and the picture below shows the top being held as I planed it to final width with a jointer plane, cleaning up the edge with a smoother. This old growth material was such a pleasure to plane I had to make myself stop when I hit the layout line.


A dead man and the BenchCrafted Leg vise made holding and working the edge of this large board quite easy. Below is a link to a short video showing the last passes of the plane on the front edge of the top.

http://youtu.be/NjrvNVT8f8k

Ron


Thursday, May 3, 2012

Nailed Furniture and These 4 Boards

Lately there has been a resurgence of interest of nailed furniture. I became interested in this idea while nailing down the wide pine floor boards during the construction of my house. I was amazed at the holding strength of square cut nails and began incorporating cut nails in furniture pieces that I made for my house.

 I think most that are intrigued with this idea are still trying to define the parameters of what exactly qualifies. I've read that nailed furniture is devoid of joinery but what does this mean? Where are the dividing lines between what is considered joinery? I can't imagine one could create a good nailed piece without using glue. Does the addition of glue constitute joinery?

 I guess one deciding factor is the use of fasteners, but this brings up another question. Screws. Screws are fasteners and nails are fasteners. I can't imagine the top of a cupboard on a sizable piece of furniture would stay in place long with just the use of nails for attachment, especially if there is reason to move the piece on a fairly regular basis. Even though it's not the correct way to do things, people will always look for a way to grab the top and lift up when the need arises. Then again maybe there is a solid method to attach the top of a case piece with nails that I've not come to as of yet. Certainly we'll use screws for attaching hardware but does using screws to fasten wooden parts together constitute joinery?

The piece below is nailed with square cut nails but given it's small size there's not a lot of stress on any part of this piece.


 Last year I was commissioned by a local church to build a piece that would provide a place for the elements of Communion. I've not made a lot of rectory furnishings but this church is fairly unique in that the building is very craftsman in style and the details are quite simple in form. It has none of the formality that one usually associates with churches so this worked right into my interest in simpler furnishings which has been my mindset as of late. As I worked with the Pastor to develop an idea for this piece we came upon the idea of a "Communion Cupboard". I was a proponent of this idea because of some special boards that I had in my possession.


As you can see in the above picture there is a rather large sugar pine board on my workbench. I possessed 4 of these boards that were 22" wide, 1.5" thick and 8 feet long. They were quite flat and there was not a knot to be seen anywhere in these boards. Only one piece possessed a check that would have to be sawn out.


 I came into these board approximately 8 years ago, and the gentleman that owned these boards before me had purchased them in 1961. I know that wide sugar pine boards can still be had today but these boards are from old growth trees and quite frankly I've never seen anything quite like them. All these years I've been waiting for a project to use these boards in their widest context and the design of the "Communion Cupboard" fit perfectly.


One of the machines left in my shop from my days as a full time commissioned furniture maker is a 25" Woodmaster planer. Obviously I would need to flatten one side of these pieces before utilizing that tool. As flat as I thought these boards were they still required a considerable amount of hand work with planes to make them flat and accurate enough for the piece I had designed.

The simpler the piece the more of a premium is placed on accuracy and proportions. This piece will have two sizable doors that will be required to lay flush in the case. In lieu of making many compromises later I have to make some very accurate piece parts in order to pull off this design.

I know I've wandered a bit in this post and you're probably wondering why a Plane maker would bother with taking on a commission of this type. It's not so much the piece as much as it is the opportunity to work these boards. Everyone that has laid their eyes these boards in person has marveled at this wood. I feel quite privileged to be the one that gets to create something from these 4 boards and given that these boards are so unique It's only fitting that they be put to use in a setting where many people will have the opportunity to enjoy them.

You may be wondering why I'm just now posting about a commission that I received a year ago. Well.....I am a Plane maker and that being the case I've had to build this piece in my "Spare" time and therefore it has taken a while.

This brings up another question, and I realize I've asked more questions than I've answered in this post, however here goes...Is there any such thing as "Spare" time?

Ron


Monday, April 23, 2012

Celebrate the Journey!

 Remember the things you made when you first got into woodworking? Some of them are probably still in your home or the home of other family members.

Now that you’ve progressed way beyond that level of work you probably sort of wish those other pieces just didn’t exist anymore, at least not in a prominent place in the house, and even though there are some quite good pieces now in the collection it probably just irks you to no end when your family members are showing visitors around the house pointing out the pieces you’ve made and they always include the ones you wished they would leave out of the tour.

Yep…..,me too, but hey let’s get over it. The truth of the matter is this. You probably put a lot of time and effort into those pieces and even though you had not perfected your dovetailing and finishing skills and most probably assembled most of the components with screws in lieu of finely executed joinery, they probably turned out pretty good in spite of everything you didn’t know at that time. Why else would they have stood the test of time and still be in your house when the assemble in 10 minutes particle board stuff has long been gone to the dumpster?


After 4 years of construction we finally moved into our new/old house about 6 years ago. I was really torn about which pieces I wanted to transition into the new home and which ones I would have just as well left behind. We had the perfect place in our new kitchen for a corner cupboard and we had a pine corner cupboard that I had made many years ago and frankly was quite proud of at the time. I resisted the idea of moving that cupboard into the kitchen and for many years it was part of the furnishings my youngest son used in his living quarters in the Garden House. I knew I could make a much better piece and had good intentions to do just that.

But time passes and people want planes and I aim for them to have planes so the corner of the kitchen that so deserved a corner cupboard was occupied with an iron baker’s rack that I really didn’t like at all, but due to my stubbornness about the corner cupboard we were forced to live with it.

Recently our youngest moved into an apartment. When we finally settled down from the celebration of finally having an empty nest we had to decide what he was to take and what was to be left behind. We decided he should not take the pine corner cupboard to his new digs. I cleaned out the corner cupboard and went over the outside with a dark scratch cover liquid which in this case actually accentuated all the nick, dings and scrapes the soft pine cupboard had received in it’s years of service.


The cupboard combined with a table that I also didn’t consider one of my better efforts now resides in our kitchen and I have to admit I was wrong this entire time. Both pieces look very at home in their new location. Julie resisted the temptation to say I told you so, but I certainly would have deserved it.

Furniture is part of life. Especially when you’re talking about pieces made by someone in the family. Woodworking is a journey and those pieces that you’re not so proud of are part of that journey and were a necessary part of getting you to where you are now in your woodworking skill set. Don’t be embarrassed. Celebrate the journey!


Ron

Wednesday, April 18, 2012

Lie-Nielsen Open House at WoodCraft Atlanta This Weekend

 The Atlanta WoodCraft store is one of the best woodworking stores I've had the pleasure to visit. Owner Steve Quehl stocks everything you'd ever want or need for woodworking and this store also contains a state of the art teaching facility. Steve is a hand tool woodworking enthusiasts and his store is one of the few WoodCraft stores that stocks Lie-Nielsen tools.

This weekend I'll be there displaying a few of my planes and Representatives from Lie-Nielsen will be there to demonstrate and answer all your questions about their extensive line of tools, and if you run out of questions about their tools you can ask Tim what it's like to work on a Lobster boat off the coast of Maine.


There will also be a new face in hand tool woodworking present at the store this weekend as well. Jon Fiant is a custom woodworker that also happens to be a Woodworking bench builder. If you want a workbench that contains the renown BenchCrafted vises but don't have the time or inclination to build a bench, then Jon is the guy that can build that bench for you whether it be a solid top or split top Roubo or a Shaker style workbench or any other design you wish. He plans to have an in progress Shaker style bench at WoodCraft this weekend that features an integral device to make the bench easily movable. I'm looking forward to seeing this myself.

Hope to see you there,

Ron

Tuesday, April 10, 2012

How Does Your Garden Grow?

Some of you may remember the blog post toward the end of last summer about a new garden area we developed adjacent to the shop. At the Woodworking in America Conference last fall Julie and I were amazed by how many people commented on the garden post. This post is a garden update.

The plantings managed better thru August than I had anticipated. The exception were the Native Azaleas. It seemed we couldn't give them enough water and before winter arrived they had lost most of their foliage. Julie and I were wondering what might be a suitable replacement. We decided to give them the winter to settle in and see what would happen in the spring. They bloomed profusely and seem to be making a come back, unfortunately I didn't get any pictures while they were blooming.


 As you all well know spring came early this year and before I even thought about taking pictures many of the plantings were past blooming. Some of the later spring offerings are showing up at this time and the new fern fronds have emerged. I love the reddish orange color of the new Autumn fern foliage.


 This overall pictures gives you an idea of just how green it is in Georgia this time of year. It's so green most of the foreground in this photo blends into the background.


These variegated hostas (above) are not showing much contrast. Sometimes too much compost makes them so green they don't show the variegation as much as we'd like. They seemed to emerge overnight it seemed.

The oregano shown below was much the same, however with the mild winter these plants never really went dormant. In fact I visited this patch a couple of times during the winter to do some harvesting on pizza night. Nothing better than herbed pizza crust with fresh oregano and rosemary.


Another hosta (below) emerging later than the others, yet still quite early in the growing season


The Radican Gardenias are a main stay of our woodland garden and will be sporting small white flowers before long.


Julie and I installed drip irrigation in two of the planting berms last fall. We still need to install another drip system into the last berm this spring. Warm weather arriving so early has me a bit worried as to what might be in store for this summer.

We'll be adding a few more plantings to the garden yet this spring and I'm keeping my fingers crossed that the deer don't decided the salad bar is open. I have to admit the hostas look hard to resist.

Ron