Friday, November 18, 2011

Haven't Made One Like this for a While, New Version 875

Usually when people order an infill plane they're sort in for a penny in for a pound, if you know what I mean. Most woodworkers, and thank heavens there are exceptions, will typically order one infill and it will typically be a final finishing plane which explains the popularity of smoothing planes as compared to other type hand planes.

I offer walnut as a standard infill wood but I seldom build a plane with that infill wood. I stock walnut that I purchase from a supplier in Idaho. This material is harvested specifically for gun stocks and is air dried in the high desert environment. For this reason it is typically more interesting looking than your average walnut and the color is typically quite good as well.

But I digress, most customers decide that it's worth it to spring for the more exotic and dense woods for this type purchase so I seldom make a plane with walnut infill.
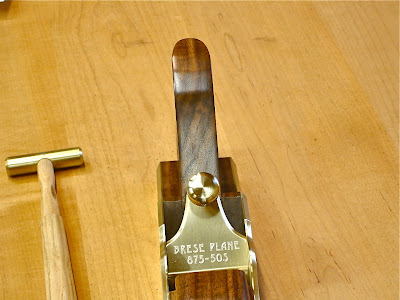


When I first selected the walnut for this plane I wasn't particularly impressed. I chose it because it appeared evenly grained and this plane is going to a shop in Chicago and shops that are close to major lakes typically need this consideration. However once I started the polishing process on these bits it did what wood commonly does....it surprises you.

I was applying a polish of garnet shellac and as this process progressed the contrasting colors of this walnut became quite apparent. Actually this piece was rather unusual with lighter golden colors contrasting with the darker brown areas of this wood. I had certainly underestimated the character if this piece.

This plane is a bit different in other ways as compared to the 875 Model planes that I've made in the past. Those planes had the model numbers 875-250 and 875-W50. The 875-250 plane used a 2" wide iron and was pitched at 50 degrees and the 875-W50 was the same configuration but accommodated a wider 2.25" wide iron.

I always preferred the plane with the 2" iron. Yes, I'm one of those people that like a narrower smoothing plane, plus I like to maintain a mass to iron width ratio that makes a plane easy to push thru the cut. Planing should be a pleasurable experience especially in the final smoothing stage of your work. A time to relax a bit after the hard work of using planes we rely on for the heavier wood removal required for straightening and flattening.

My recent design emphasis has been to find the ideal ratio between mass and iron width and to refine the balance of the elements that make up the 875 plane. The plane pictured above is the result of this work. The older version 875-250 typically weighed right around 6 pounds with a dense exotic infill and just a few ounces lighter with walnut infill. This new version which is now Model 875-50S uses a 2.125" wide iron and weighs 5 pounds 5 ounces with walnut infill and will probably have a weight of 5 pounds 8 or 9 ounces with dense exotic infill.

In the new configuration this plane now has a wider iron than the 2" wide version and weighs 1/2 pound less. A half pound is quite a profound weight reduction for plane of this size.

So how did I increase the width and take 8 ounces of weight out of this plane. The largest surfaces on this plane are the sole and the iron and those are the best area to look for weight reduction. The sole went from .375 thick to .312 thick and the iron went from .250 thick to .218 thick. The result is a plane that is easy to push thru the cut but doesn't tug on your wrist in the return stroke. It was this slight tug on your wrist that I was looking to eliminate.

I've been using this plane for the last couple of days since it's completion and I have to say I think it is a very refined version of this plane.

Ron


Monday, October 31, 2011

Things that Caught My Eye at WIA, and Questions About Plane Kits


At the last two Woodworking in America Conferences the attendance has been great and the Market Place has been busy. For this reason I typically have a hard time getting away from the booth long enough to have a look around myself. This year however I was accompanied by my wife and also enlisted the assistance of a couple of customers that are local to me in the Atlanta area. Several times during the week end I would look over at my friend Steve Walls and say "Hey Steve, stand here and be Me for a few minutes". This gave me the freedom to look around a bit more than usual and I enjoyed seeing the new offerings of the assorted vendors.

Of course I didn't actually have to leave the booth to see the first item that caught my eye. In fact it was right in our booth space. The guys from Elkhead Tools resided with us in the Market Place and right away Gary Benson showed me the new screw driver they were offering. It is the official Brese Plane screw driver specifically manufactured to the fit the fasteners on the planes I produce. It's shorter length gives it more control closer to the work and it fits the slots in the pivot pins of the lever caps and the fasteners that hold the rear tote on the Precision stainless planes. Having close control due to the shorter length keeps me from skittering the screw driver across the plane side during re-assembly (yes this has happened to a nearly completed plane and it sent me back to the lapping plate for considerably more work).

As you can see it's made to the same high standards as the rest of their offerings. We enjoyed having them in the booth with us this year. Besides making great stuff they were fun to hang out with.

I've been looking for a properly sized plane hammer for a while. I've actually prototyped a very nice plane hammer but quite frankly we've been so busy making planes and filling customers needs that we just can't seem to find time to put another iron in the fire. Back Channel Tools was offering the hammer show below at WIA and I came home with one.

What I really like about this hammer is the weight and the length. It's light enough to allow fine control of the position of the plane iron. With this hammer I have to strike the iron with a bit more authority than usual especially for the lateral adjustment but then again that's what I really like about it. The hardest part of learning to adjust a plane with a hammer is learning how lightly to strike the iron for fine adjustment and I believe this hammer will shorten the learning curve which is typically only about 30 minutes anyway. It has a faceted handle which helps index the hammer in your hand and the only minor quibble I have is the sharp edges on these facets. This was an easy fix. It only took a few minutes with a scraper, a bit of fine sandpaper and some qualasole and now it feels great in the hand.


Many people that came by our booth at WIA asked about when we would be re-introducing plane kits. Actually I still don't have a definite answer, however we are working toward that end. I've recently brought an apprentice into the shop and his work is progressing rather nicely. His name is James Green and he's an enthusiastic student of the craft. As his work progresses and I feel that he can produce plane bodies to my standards then he will be responsible for producing plane bodies for that product line (with my oversight, and the shop's not that big). At that time we will re-introduce those offerings.

On a final note I wanted to once again say "THANKS" to Steve Walls and Charlie Levan for the help at this years WIA.

Ron

Saturday, September 10, 2011

WIA, Random in Progress Pictures, and it's Catalog Season

The Woodworking in America Conference is fast approaching. As a result my shop is in a state of total disarray. I didn't take any pictures but if you saw my shop your first question would be "did anyone get killed when the bomb went off?!" Given all the obstacles, I did manage to complete two small smoothers and made plane sides for a stainless panel plane today. I vow to clean up the shop before anything other work takes place in the shop. Getting ready for a show like WIA makes the shop schedule very hectic but I really look forward to this event.

I get a lot of questions about my plane body assembly method. Once a plane body is assembled it becomes necessary to make the assembly hardware go visually away. In the picture below all the pins on this 812-50S stainless plane body have been milled down to within 1/32 of the plane side.

Then the pins are peined around their perimeter quite thoroughly and then milled flush. The picture below shows the pins after peining.

Then the pins are milled flush and the sides are surface ground. You can still see the slight silhouette of the pins (pic below). Once the plane sides have been lapped they become even less apparent.

As many planes as I've assembled this process it still amazes me.

Summer is officially over and with Halloween just around the corner and Christmas looming in the near future all our mail boxes are filling up with catalogs. While eating lunch one day I was browsing thru some of these catalogs. I found some amazing products that I think you must know about. Please add a large dose of sarcasm to that last sentence.

In the picture below you will see that for $7.95 plus shipping and handling we have the unique opportunity to wear mismatched socks. This happens at my house anytime I try to get dressed before I'm fully awake. Save the $7.95 and put own your socks before you've had coffee.

KISS Christmas tree ornaments. I'm sorry but this is just wrong on so many levels. I think even KISS fans draw the line at Gene Simmons Christmas decorations. If you will have one of these ornaments on your tree this year don't tell me about it. I may just not want to know you.

I saved my favorite for last. It's the "ELVIS LIVE! MR. POTATOE HEAD".

I've been trying to imagine being in the meeting where they decided this toy was a good idea. I can't imagine any circumstances where this idea gets a thumbs up from everyone with a vote, especially considering the target audience is not old enough to have a sign of an idea about who Elvis is or was depending on whether or not you believe Elvis is alive or not.

Okay I double checked the appropriate age for this toy. It says" for ages 2 and up". Next time someone ask my age I'm gonna say "UP" and point to the sky. I won't specify which finger I'll be using to express myself.

If your age is "UP" then you will remember that when Mr. Potatoe Head was first introduced you got all the facial parts, ears and a couple of hats, but you had to furnish your own potatoe. Some assembly was required and it required a trip to the produce department of the grocery store.

By the way.... I was at Walmart yesterday and I swore I saw Elvis....turns out it was the guy driving the wrecker I noticed in the parking lot. As he was getting into the wrecker I ask him to sing a couple of bars of "Love Me Tender" at that point he gave me a finger gesture that expressed that his age was also "UP" and drove away.

Ron

Monday, August 8, 2011

Improving the View from the Shop Part 2, It's Finished

When we embarked on this project we knew that there would be quite a change in the looks of this area, however I don't think we quite anticipated how much we would enjoy the finished outdoor space. All the plants in are, the landscape fabric is in place, and the pine straw and cypress mulch is in place. Now it's up to us to keep the plants alive.


We have a watering schedule and so far everyday we've watered it's also rained. When people complain about not having rain there's on old saying, "to get some rain you've gotta pay the preacher". Our landscape contractor Charles just happens to be the minister of our church so we've paid the preacher, literally. I guess that's why the recent scattered thunderstorms have found their way to our patch of earth for the last several days. At least that's my story and as long as it's raining I'm sticking to it.

As you can probably tell this is a woodland garden and it required some thought to select plants that would grow well under these conditions and would also be somewhat deer proof, if there is such a thing. The plantings consist of Kanjiro Camelia, Wax Myrtle, George Taber Azaleas, Tallulah Sunrise Native Azaleas, Formosa Azalea, Radican Gardenias and Autumn Fern. Recently we've added some Variegated Hosta which is probably like announcing that the salad bar is open to the deer. We'll be tuning up the motion activated sprinklers this evening in hopes of scaring the deer away if they happen to frequent the garden. If it doesn't scare them away at least it'll cool em off while they're enjoying the hostas.

It's been hot here but sometimes in the evenings after a thunderstorm it actually gets somewhat tolerable to be outside and these days Julie and I have spent a lot of time in our new garden space.


Of course now we have another problem. Since this area looks so nice, we now have about 5 other areas in the yard that look particularly ratty and poorly maintained. When you own property the list of chores never ends.

Ron


Monday, August 1, 2011

Improving the View from the Shop

When I look out of the windows of my shop I see the pergola structure in the right side of the picture below and also this vacant lot looking space. This is an old house site. Julie and I have been brainstorming an idea to improve the looks of this place. We decided on some type of garden. We knew we could put down some timbers and back fill these spaces with soil and I guess that would have created some kind of garden but this idea seemed to lack any real inspiration so we just slowed down to take time to give this some thought. When we would visit the pergola structure for cooking out and just relaxing in the swing we studied this area in an attempt to develop a plan.

This is a view of the flat space with the pergola and shop in the background. As you can see the Wysteria seems to like the location of the pergola structure just fine.

One evening (before the onset of hell......excuse me, I mean summer) while sitting in the swing we began to visualize a plan for this space. The first idea that came to mind was that we desperately need changes in the elevation in order to offset the boredom of a flat space, in fact we saw berms in our vision that resembled sand dunes.

The idea of changing the lay of the land in such an extreme way certainly took the scope of the project out of the realm of DIY so we contacted a landscaping professional who also happen to be a good friend. Charles is good at what he does and has a vast knowledge of plants and for this reason he had a backlog of work. We knew he was our guy so we waited patiently for our names to rise to the top of his list. Charles contacted us just before we left for Maine to attend the Lie-Nielsen Open House Event and when we returned he was ready to begin. The first order of business was dirt and a lot of it. In fact two large dump truck loads of top soil. I thought we might need three loads of dirt, Charles looked at me like I had two heads and commented that he thought two loads of dirt would be plenty and of course he was correct. He's a professional landscaper and I'm a plane maker and I guess I would need to keep that in mind.

The predominant soil composition in Georgia is red clay. As you can see in the picture the soil that was delivered to us was nice rich, loamy top soil. Knowing where to access the right materials is another reason to hire a landscape professional for this kind or work.


Today was the day they starting placing the dirt and by the end of the day a transformation had begun to take place. All our prior landscape projects had been accomplished with hand tools and a wheel barrow. Of course I certainly advocate hand tools, but shovels, rakes and hoes are a very different kind of hand tool and two men and a good piece of earth moving machinery was certainly the way to approach this task.

Of course a lot of our projects in the shop start with power tools and then the hand tools refine the work. It's the same with landscaping. The planting berms were all hand worked before they had taken their final shape.

Next up is weed block fabric on the planting berms, cypress much on the walking path and then all the plants and shrubs settled in with pine straw mulch. When I looked out the shop windows today it was already a much nicer view, especially considering I was in an air conditioned shop.

Ron

Tuesday, July 12, 2011

Just Finished 812-50S Smoothing Plane, Going to Maine

When I say "just finished" I mean "just finished", I began to shape the rear tote for this plane today just after lunch and about 7:00 pm I was applying the last bit of french polish. Shellac is wonderful stuff! This was the plane I needed to complete to be ready for the trip to Maine for the Lie-Nielsen 30th Anniversary Open House.

This is the first plane in which I used some of the Macassar Ebony billet for the tote and knob. Macassar Ebony is quite dense and quite hard to work, even more so than Gabon Ebony which is soft by comparison. However I have to admit it actually worked better with hand tools than with power tools. When working wood of this type with hand tools you get feedback thru the tool that lets you know to be careful, with power tools the feedback you get is the visual damage that occurs when it chips or tears out and then of course the hands tool have to clean up the mess the power tools left.

I'm sure these pictures don't do it justice, but the interplay between the dark and lighter areas is very pleasing to the eye and adds a lot of visual interest that's just not present in the solid black ebony we've used in the past. It almost looks as if someone swirled dark and milk chocolate together.

This 812-50S is one of my favorite planes. It's a true smoother with a sole length of 8 inches, the iron is 1.875" wide. The weight is 4 pounds 4 ounces and the balance is quite nice in the hand. This one is going with us to Maine so if you're attending the L-N event stop by and have a look.


The heat index in Georgia today was so high I won't even mention the numbers. Just looked at the 5 day forecast for Warren, Maine. High 70s during the day and high 50s for the overnight lows. I'm looking forward to a break from the heat!

Ron

Sunday, July 3, 2011

Something Different this Weekend in the Shop

I've been so consumed with plane making that it's been over a year since I've done anything like an actual woodworking project. In a phone conversation with another plane maker I made the statement " we should never get very far from woodworking because making furniture is different than making shavings". I followed that with "we'll be better plane makers if we continue to pursue other types of woodworking". Well like a lot of folks I guess I haven't been practicing what I preach.

I'll be participating in the Lie-Nielsen Tool Works 30th Anniversary Open House later this month so for the last couple of weeks I've been in the metal working room making plane parts, a lot of plane parts and then I made some more plane parts and a few plane parts after that. You get the picture? I've been making a lot of metal parts to very close tolerances and this takes a toll on a guy mentally and physically. Now don't get me wrong I'm not complaining. I live for making planes, but sometimes you just have to do something else.

This weekend I decided to pursue a woodworking project. I've been wanting to make the hanging Shaker cupboard pictured in this post for an awfully long time. I saw this piece at Pleasant Hill Kentucky many years ago and run across it frequently when thumbing thru some of my books on Shaker Furniture. When Chris Schwarz featured it in a blog post I was once again reminded of my desire to build this little cupboard. Saturday about 10:00 am I pulled out some cherry boards that I thought possessed the correct scale of grain for this project and by the afternoon I had enough parts roughed out for two of these. I spent most of Sunday afternoon completing and refining most of the parts and making the couple of glue ups required for the back and the front corners. By later in the evening I had most of the parts complete.


I was reminded of a couple of things while I was working on this little project.

(1) The guys at BenchCrafted make some great vises. As I was building this Shaker cupboard using my Shaker bench I never had to give work holding a second thought. The vises did just what they were supposed to do. They made work holding effortless.

Disclaimer: Jameel, Father John and Hunna Abraham are people that I consider very good friends, however that doesn't change the fact that the BenchCrafted vises are just awesome.

(2) Using hand planes makes very accurate furniture parts and saves a lot of sanding work. The cupboard in the picture has not been assembled. It is just freestanding on my workbench with no fasteners holding it together, only gravity and well fitted contact points. I mentioned sanding because I will be adding some age to this piece and that will require a few finishing processes that require a consistent scratch pattern for proper adhesion of the finishing materials.

Stayed tuned, when we get back from Maine I'll be getting the last details of this piece completed and will progress into the finishing process.

Ron

Wednesday, June 1, 2011

Cutting Bits from Chunks

A previous post featured a large Maccasar Ebony billet that I acquired. Even though this piece is estimated to have been drying for at least 17 years past experience has taught me that it's a good idea to give billets of this type adequate time to acclimate to a new environment prior to processing. Of course the other possibly explanation to why I haven't decided to cut up this piece of exceptional timber is just that. In billet form it is a very formidable looking piece of wood and part of me did not want to alter it just yet. So I've admired it for several weeks and now it's time to cut it into usable pieces for plane making.

There is also another reason I've waited. It's early summer here and for that reason the average daily humidity is higher than it is during the colder months. These are much better conditions for breaking up a billet. Freshly exposed surfaces react much more favorably to an atmosphere that is not extremely dry and this gives the material a chance to react to it's new exposure without having the moisture sucked away from the surface much too quickly.

Past experience has also shown me that it is best to begin the process of breaking down log segments and billets by cutting pieces off the length in increments of 11". If there are checks on the end of the piece then the first piece will probably need to be just a bit longer than 11". This billet was 4.75" thick 6.5" wide and 53" long. Maccassar Ebony has very high specific gravity, yep it will sink in water just like a rock. This also means this piece was quite heavy. It was all I could manage just to hold it on the table of the bandsaw and feed it thru the first cut off it's length. I suffered thru the first cut knowing that every subsequent cut would make the piece lighter. Now that I had my first section cut from the length of the billet it was time to start re-sawing.

At first I thought I would probably need to change to a wider bandsaw blade than the 1/4" wide blade that I normally have on the bandsaw for general shaping of curved surfaces. After all I was about to attempt to re-saw thru 6.5" inches of very dense material. I instead decided to give it try with the 1/4" blade before going thru the trouble of making the change. The blade is a Timberwolf brand blade and I had heard of many people getting favorable results re-sawing with relatively narrow blades of this brand. I was very pleasantly surprised. The blade went thru 6.5" of this material with relative ease. I took my time and made sure I didn't ask the blade to cut at a faster feed rate than it was capable and the results were actually quite accurate.

At this point I stopped to seal the freshly cut end of the billet. Most checks start in end grain and I've found a good coating with a 3 lb. cut of shellac helps keep this part of the billet from drying too quickly.

After a couple of subsequent re-sawing cuts on the bandsaw I had some very nice blanks sized to yield two nested plane totes.

One side of the billet has some noticeable surface checks. This is actually very typical and I'm in no way complaining. Stresses build up in these billets and checks occur. The trick is to figure out how to work around the checks to yield the best material. When laying out my cuts I had this side marked to yield thicker pieces that would be appropriate material for turning knobs and this would also give me some leeway in cutting around the checks.

Now I have many surfaces exposed directly to the air for the first time so I worked quickly to seal the ends and spray a light coat of lacquer on the flat sawn surfaces of the tote blanks. All this in an effort to slow down the effect of being exposed directly to the effects of the atmosphere.

Now these blanks get to rest for a while and if I've done my job correctly the next time you see them they will be plane parts.

Ron


Saturday, May 7, 2011

Sometimes You Just Gotta Get Out and Meet the People, or Back on the Road Again

It's been hectic in the shop this week in preparation for another road trip. I'll be traveling to Cedar Rapids to spend some time in the shop of Jameel Abraham and then later in the week we'll be heading to St. Louis to participate in the Lie-Nielsen Hand Tool Event being held at the shop of Kent Adkins.


After seeing Kent's shop featured in Chris Schwarz blog I jumped at the chance of participating in this Lie-Nielsen Event. When I later discovered who the other presenters would be at this event I came to the realization that I couldn't have made a better choice of venues.

To be at the same event with the likes of Konrad Sauer, Matt Bickford, Bob Zajicek, and Jameel Abraham and of course the excellent crew that Lie-Nielsen will have on hand, makes this a very special occasion.

Looking at pictures online and in brochures only gets you so far in making decisions about the tool kit you select to help you accomplish your woodworking task. At these events not only do you get the chance to handle and use the tools you also have the opportunity to gain the insight of the people that create these tools.

The group of presenters I listed above are just a few of the growing number of independent toolmakers that spend countless hours in their shops designing and creating tools for the growing population of woodworkers that now incorporate more hand tools in their work process than anytime in the recent past.

At these events you'll not be talking to a salesman, you'll be talking to the guy that conceived the idea, did the preliminary design, made the prototype, proved out the prototype and made subsequent changes and finally progressed to making the production version of a given tool. If you have questions these people have the answers.

I was once told that I should just make tools and let other people sell them. I could never get my head wrapped around that comment. The interaction with the people we meet at events of this type is a very big part of the enjoyment I get from creating tools for people on a personal basis. Woodworkers are some of the best people in the world and this is reinforced at every event in which we participate. Event after event we just meet more good people and make new friends.

If you find yourself in the St. Louis area next weekend, stop by the Lie-Nielsen Event, your attendance is a surefire way to make sure events of this type continue to take place.

Ron

Monday, April 25, 2011

The "J" Plane

One of the most ordered tools at Brese Plane is the small smoother that we've come to call the "J" plane. As I stop to think about why this is so, several things come quickly to mind to explain the popularity of this tool.

This plane fits the hands of a lot of different size people. I've had people of quite small size as well as woodworkers of quite large proportions pick up this plane and comment that it feels good in their hand. The rounded end if the plane presents a nice to place to grip this plane and keeps your hand from sliding forward and possibly pressing against the back of the iron which can crease uncomfortably into your hand.

The performance characteristics of this plane are well known. Many people have witnessed this plane working very difficult woods with and against the grain with relative ease. When confronted with a planing challenge, which happens frequently at WIA and the Lie-Nielsen Hand Tool Events where we show our wares, I will always reach for the "J" plane first. It has never let me down and once I've been successful with the "J" plane then I will attempt these difficult boards with some of the other planes on my bench. In other words, it's my "go to" plane.

The combination of the 55 degree bed angle, tight mouth and the unified mass that this plane creates is a winning configuration. Combine a well sharpened iron with the other aspects of this plane and the wood fibers have no choice but to shear and curl up. There's no magic, just solid mechanical elements that yield a result.

If you compare the picture at the top of this blog entry to the ones below you will notice that this plane has undergone some refinements over the past couple of years. None of these refinements has changed anything about the performance characteristics of this plane. I have reduced the weight in this tool a small amount and feel that the balance was improved by this change especially in regard to using the plane on the edges of boards and in places where the sole is not completely registered to the work piece. Almost all the other changes have been cosmetic.

I've changed to a stainless steel lever cap screws and a lower profile button on the iron that makes a handy back bevel registration point. If you're using the scary sharp method of honing the iron it's easy to place a piece of painters tape over this button, swipe it with a some paraffin and with the button placed off the abrasive you can easily impart about 1/2 to 1 degree of back bevel to the back side of the iron.

I also think that the price point of this tool has made it an attractive entry point for many people looking to delve into the world of infill planes. This plane is almost always ordered with rosewood infill. The color of the rosewood works well with the stainless and brass. I've actually been sort of yearning to make one with ebony infill, fortunately I recently received an order for this plane with ebony infill. I like a bit of a change once in a while.

I introduced this plane at the first Woodworking in American Conference in Berea, Kentucky. This event was also when I was first introduced to the hand tool woodworking community. I brought two "J" planes to the first WIA and at one point myself and a gentleman from Canada were making alternate passes from different directions on a piece of curly maple that contain some of the tightest curl you've every seen. This worked because one of us was left handed.

Since the first WIA in Berea I have been wonderfully supported by the hand tool woodworking community, Thanks Everyone!

Because of you I have more "J" planes to make. This makes me quite happy because as you know......."I sort of live for this stuff."

Ron


"If you're too opened minded your brains will fall out"


Sunday, April 17, 2011

The Last Equipment Upgrade for a Long Time!

Equipment acquisition is sometimes a wonderful way to increase your capabilities, efficiency and accuracy in your work. However it's not a decision made lightly. When you embark on an upgrade it typically involves a large amount of time and effort to research the purchase thoroughly and also to market and sell the equipment that is to be replaced.

For these reasons it almost always impacts your regular shop schedule in a negative way and creates a time period in which you'll put in long hours maintaining progress on the in process work occurring in the shop and then additional time in the evening setting up the new machine and preparing it to take over part of the work load
This latest upgrade has been one of the most challenging I've attempted to date. I know there's a guy with a beard in Cedar Rapids, Iowa that might want to argue this point, stating this machine did not have to be moved out of a basement during two rainy days. However the acquiring of the knee milling machine pictured in this post encompassed many structural and technical aspects that had not been issues in prior machinery additions. The picture above shows the mill fresh off the truck.


When I put the forks of the lift under the pallet and raised them I could feel the hydraulics of the lift straining to raise this load. The first thing that came into my mind was "what have I done?", immediately follow by a mental picture of this thing crashing thru the floor of my shop and onto the ground underneath. However I was too far into this to turn back. The truck driver had just completed a trip of 2200 miles with this mill on his truck and I don't think he would have taken very kindly to the idea of making a return trip.


To begin with this machine is massive. It weighs a good solid ton. Yep 2000 pounds. The biggest milling machine that I've handled prior to this one weighed 1000 pounds. Once you start acquiring machines that weight in excess of 600 pounds you're past the realm of thinking in terms of how many people you would need to move a given item. You've also passed into the realm of how do we move this thing without getting someone hurt. In this case I would be attempting to install this 2000 pound mill in a shop with a wooden structured floor so structural issues had to be dealt with prior to moving forward with this purchase.

I also knew that I would have to traverse an unpaved area to get to the load in door of my metal working shop. This was one part of the move that really concerned me, however it turned out to be one of easiest parts of moving the mill to the final location.

To actually set the mill into the shop it was removed from the pallet and held aloft under the ram of the head. I was very deliberate with this entire process. This was no place to get in a hurry. Finally it was in the shop. The person in the picture below is my friend Terry Sebright. He's not a big guy by any means, however seeing him in comparison to the mill you get an idea of the size of this machine.

The mill was moved into final position using a series of metal pipes and pry bars. At this point I'm just glad it's still on the correct side of the subfloor. Obviously my design of the floor shoring was up to the task.

There was still an enormous amount of work needed to get this mill up and running and finally 9 days after the truck arrived with the mill it has finally made it's first chips.

Even before this mill arrived it was scheduled for several upgrades. I'll be using a new tool holding system that is a series of collets that will allow me to change tooling in a fraction of the time this task has required in the past and there is not a major change required to go from milling to drilling.

In stock condition this mill achieves speed changes by moving the drive belt to different pulley positions. I have already upgraded this aspect. This mill now has digital speed control achieved thru a device know as a VFD or Variable Frequency Drive unit. This is one of the more technical aspects of this entire ordeal and required a good deal of research to sort out the wiring, installation and programming of this device. When it all worked I declared myself an "Electro-Magician".

There is one more major upgrade to be installed on this mill. It will receive a 3 axis digital readout system. This system will allow locations to be precisely positioned to within 2/10s of one thousandth of an inch.

Now that the machinery moving is over for a while I'm going to concentrate on posting more about the actual process of plane making and how these machines figure into the process and also about when the machine work stops and the hand work begins. Machines can do a lot of great work, however it's only when the human hand comes into the work that a certain look and feel is imparted to the item, and that will never change.

Ron

"Experience is the Name we give to our Mistakes"

Wednesday, March 30, 2011

A Screw Driver can be a Very Enjoyable Tool

Like most people I have a occasion to buy new tools for the shop and when I obtain a tool with which I am particularly impressed I like to share my joy of owning this tool or in this case a set of tools. When I have a need to fulfill I usually like to purchase tools from another independent tool maker such as myself. Bear in mind that when I write about other’s tools in this blog these are tools that I have sought out and purchased. I am not encouraged to promote other's tools and only do so of my own free will and most importantly if I think the tool is particularly worthy.

I pursue making fine tools on a daily basis and I know most of the people in the hand tool woodworking world that also produce products of a similar nature and quality so I’m not easily impressed. I now own a set of screw drivers with which I am very impressed.

I use screw drivers an awful lot. While sizing the height of the lever cap pivot pins for one of my planes I remove and install these slotted pivot pins several times and in the process of tuning the lever cap to the back of the plane iron I may remove and install the lever cap pivot pins several more times during this process, not to mention the many other occasions during the day that require the use of a screwdriver.

During the years that I made furniture I often wished for a good set of wooden handled screw drivers. I searched for this elusive tool and the best I could find was a set that I purchased from Garrett Wade. They had square wooden handles with a sprayed lacquer finish and even though they were better than the plastic variety they still left something to be desired. They were advertised as being made in Germany. They were not exactly the Mercedes of screwdrivers.

I continued to search and once I entered into making tools I often encouraged other tool makers that made small tools with turned handles to develop and offer a good set of screw drivers. Most of them looked at me like I had two heads and typically walked off mumbling something about how I had gone completely round the bend.

Thankfully waiting round the bend was Gary Benson, Dave Lindeman and Chuck Pyne of Elkhead Tools. They obviously also thought the world needed a better set of screw drivers because they have produced a set of tools that exceeded my wildest dream of what a set of screw drivers should be.

Cheap, poorly designed screw drivers are hard on your hands and most of them don’t fit the slots of common screw sizes well at all. When they slip they mark your work and this just creates more work for a plane maker. The Elkhead Tools drivers are an absolute pleasure and quite frankly every time I hold one in my hand I marvel at how they nestle in my palm and the feel of the cocobolo handles is just so enjoyable that I believe I unconsciously smile every time I pick one up.

I’ve waited a long time for a good set of screw drivers and these guys have obviously put a lot of effort into developing these tools. These tools consist of hand turned cocobolo handles, German tool steel shank and tip with brass ferrules integral of the handle insert that gives these screw drivers such a solid and well put together appearance and feel. The tips fit the slots of common size screws quite well and don’t ding and deform the edges of the screw head slots.

If you’re getting the idea that I like these tools you’d be correct. Let me say this however. These screw drivers are most likely a bit pricier, well actually a lot pricier than any set of screw drivers you’ve ever purchased but don’t worry you’ll be getting your money’s worth and you’ll know it every time you pick one up.

If you would like to learn more about these screw drivers and the other offerings by Elkhead Tools you can visit them online at www.elkheadtools.com

Once you've acquired this set of screw drivers you're going to need another set. Go right out to your local big box store and buy a complete set, maybe even two complete sets, of the yellow and black handle screw drivers. They'll probably be less than $10.00 for the whole set and then you'll be ready. Why you may ask. When your neighbor or brother in law comes calling wanting to borrow a screw driver you'll be ready. They most probably need it to open a can of paint and there is a better than even chance they will never return it. It will be well worth the ten or so dollars to keep harmony in the neighborhood and peace in the family.

Ron